Showing posts with label image transfer. Show all posts

Saturday, February 22, 2014

How to Make a "Better-than-New" Pair of Recycled Flats

--------------------------------------------------------------------------------
If you had a chance to read my last blog post,  I mentioned  I was just getting warmed up.  After experiencing how easy I altered the handbag, I immediately started looking for other items on hand I could transform!  Shoes was the next logical experiment and, I happen to have a "small" collection to choose from. 

This pair have seen better days (ya think?)   Since they were one step short of the trash bin, I thought there was nothing to lose.


Before (pretty ratty heh?)

This is a beginner project and requires very little time, talent or supplies.  

Here's all you need (minus the brayer):


1.  I covered the shoes with one coat of Golden liquid acrylic paint (titanium white) - you could also use a Folk Art paint (often available at the dollar store for a buck or two)


2.  You will need two sheets of Craft Attitude (available on-line at www.Amazon.com)

3.  Print your pattern using an inkjet printer on to the Craft Attitude sheets and remove the backing.

4.  Liberally apply glue to the shoe - and I mean liberally.  Don't scrimp on the glue people!


5.  Place the translucent film over the shoe, lining it up to make sure it cover as much as the shoe as possible.


6.  Using your fingers smooth out the Craft Attitude beginnning at the toe and working around to the sides.  If you misalign it, you can lift it up again and reapply.  It isn't that stressful!  You have plenty of working time.  The glue doesn't dry quickly and the film is sturdy and it is also a little stretchy and will 'move' 2-3 mm if you are out by a smidge.

7.  Take your scissors and roughly cut out the area that is surplus that is laying over the opening in the shoe.  (You will need this to finish the back of the shoe.)   Cut out around the sole of the shoe in a similar fashion.   

8.  Using an x-acto knife, make your fine cuts to finish off the edges using the lines of the shoe and sole as your guide.  With a sharp blade, a ten year old can manage this easily.

That's it!  If you are doing this for the very first time, it may take up to an hour to finish both shoes.  I have a bit of experience so I completed the project in under 30 minutes.  Yes. Half an hour. 

After shots: 


How easy was that?  

It took me much longer to complete this blog post than it did to transform these beat up shoes into a better than new pair of shoes!  And, even though I am not a 'matchy-matchy' person, I just may throw on a white shirt, a pair of jeans and break into a new 'coordinated' look!   

Thanks for reading!  I am half way through my next pair of recycled shoes and will be back to share my musings early next week!  

Wednesday, February 19, 2014

Craft Attitude Makeover Part One - Boho Handbag

--------------------------------------------------------------------------------
I decided even though winter will still be on my doorstep for another two months at least, there wasn't any reason why I couldn't at least start thinking about spring!  And spring to me means a couple of things - warmer days, and the rebirth of COLOR in nature.  

I've seen lots of cool examples over at the Craft Attitude Facebook Page on how to personalize your iPhone, but I rarely use mine unless I am travelling.  So instead, I thought - why not try my hand at repurposing a rather lack-lustre handbag.  

I found this one at Winner's with a substantial discount and it was a light color.  Since I was introduced to Craft Attitude about two years ago, I always have my eye open for light colored and inexpensive 'objects' to add some "Attitude" to! 

Plain Old Inexpensive Handbag


This month I seem to be drawn to a color pallette that is half  Bolliewoodish and have Bohemian  and so once I`d layered a suitable number of images (courtesy of Iktupilli and Tumble Fish Studio) I adjusted the color pallettes to suit a brightly colored motif: 

Back of Bag  - digital collage

Front of Bag - digital collage


I used 3 sheets of Craft Attitude (you can use any type of Attitude product) - they are all the same just different packaging.....trust me on that!
And above is a photograph of the ALL of the supplies you need to make your handbag (gluestick,
scissors, x-acto knife, brayer....easy-peasy.


I really did not expect it to be this easy.  The fabric of the handbag (100% polyester) seemed to be  the perfect match for the Craft Attitude.  I am NOT shy with the glue stick, - just sayin....please do not try to skimp on the glue or you may end up with bubbles underneath.  Not pretty.  I NEVER have any bubbles.  I sometimes have globs of glue on my hands at the end of it all, but NO Bubbles EVER.


Above are photos of the front and back.  The purse was not the same size as the Craft Attitude (8.5 x 11 inches) so I did have to add extra little strips to each side so that it it was fully covered.  The pattern was very conducive to being able to do this successfully.  

Here are a few snap shots I took randomly in an effort to capture how beautifully the Craft Attitude molded to the fabric of the bag - I will be looking for more of this material!! 


I remain impressed at how the film becomes part of the texture...if you look closely you can see slightly raised dots on the surface of the purse.


Craft Attitude Boho Handbag - Spring 2014 coming soon!


PS - I could not stop at just the bag.....I will be back in a few days with photos of.....I bet you can you guess what I made next?   Stay tuned.

Thanks for the visit - and as always,  your comments are always appreciated...more than you know!

Thursday, November 21, 2013

Holiday Blog Hop - Craft Attitude Collage Tutorial

--------------------------------------------------------------------------------
Welcome to the Craft Attitude Holiday Blog Hop!

Teaming up with the enthusiastic and uber talented Jonathan Fong, equally talented jewelry craft expert Candie Cooper and other well known Arts/ Crafts/Design professionals and enthusiasts,  I am delighted to share with you  a relatively new  and exciting collage technique  I've developed and test over the past several months.  I call it the "Collage Under" and I'm excited to share this exciting new image transfer technique.


In this step by step tutorial,  I will walk you through  a few simple steps showing you how easy it is to combine a few scrap papers ( you most probably have on hand)   along with  one sheet of Craft Attitude,  to create a one-of-a-kind mixed media collage.  

 I love receiving  handmade gifts - nothing feels more meaningful to me in these days where time is such a valued commodity.  Why not begin today and in less than a few hours, create an inexpensive but  great gift for one of your friends or family members this holiday season? 


 "My Baby Sister - A Special Gift"
8 x 10 mixed media collage 
Mixed Media Artwork by Trudi Sissons
Image Credits:  Tumble Fish Studio - Winged Splendor and Merry Merry Kits
Copyright 2013 All Rights Reserved

Skill Level:  Beginner-Intermediate Mixed Media Craft Enthusiasts
Time Required:  2-4 hours max

Here's a list of what you'll need:

* 1 sheet of Craft Attitude Art Film  (you can buy any one of the various packages of "Attitude" - they all contain exactly the same product, just different instructions explaining different ways to use it) 
* UHU stic  - acid free glue stick that dries clear (or other comparable brands, like Mod Podge or Elmers)
* Photograph  -  I used a vintage image from Tumble Fish Studio's "Winged Splendor" kit available from DeviantScrap   But, why  not add that extra  personal touch to your gift  by using your own vintage family photograph?  The Graphics Fairy also has a large selection of vintage photographs available at no cost. 
* An assortment of left over scrap paper bits (if they're handmade or cotton, even better!)
* One page from a book  slightly larger than the  finished project dimensions (I used a vintage paper from an old dictionary)
*  an Inkjet Printer
* a brayer or similar roller (in a pinch, use your finger tips...I often do)
* Golden  Artist Colors - Soft Gel Matte #3010-5 (optional as a final top coat and/or as an adhesive)
* Optional - Mat and Frame (see Step 5 for money saving tips)

 Steps:

1.  Gather up a collection of complimentary  paper scraps combining different colors and textures. 


2.  Using whatever image software program you have, print your  photograph on to Craft Attitude, remove it from its carrier sheet and place it on your work surface shiny side facing up. 

 Photograph used - Copyright Tumble Fish Studio's "Winged Splendor Kit"
(see above information to purchase this image)


Tip:   If you like, go ahead and test different compositions by placing different papers under the transparent art film  image until you are satisfied with your composition.  I decided  on the  arrangement above and then numbered which scrap I would glue first and so on.  A bit of planning at the start of your project may save you time overall.

3.  Glue each scrap of paper right side up, then turn it over and adhere it to the shiny side of the Craft Attitude art film. Using a brayer or your fingers, smooth  the surface to ensure maximum adhesion.  Repeat, layering each scrap until you have achieved your desired composition.

Front and Back of  Collage -  Work in Progress 

4.  Take the final large printed page from a book or dictionary, cover it with glue and adhere it on top of all of the other smaller scraps, again using a brayer to ensure a full adhesion.  This layer will cover any spots  not covered with the other paper you've attached and shine through to the top.  It also provides a good substrate to hold your final piece together.

5.  Attach your collage to a mat and frame and PRESTO - another gift ready to go!  

Tip:  To save money, size your final piece to standard sizes - 4x6, 5x7, 8x10.  That way you'll be able to buy ready made mats and frames at a fraction of the cost of  having  your artwork professionally framed.  Michael's often has 40% off a large selection of their standard frames too.

 The images below  illustrate the final collage (both front and back) and  a sequence of  photos  as it progressed from start to finish.


Now it's your turn!   I would love to see your mixed media collages using Craft Attitude.  You can mail me at trudisissons@shaw.ca with a link to your work. 

For questions about where you can purchase Craft Attitude please visit their website at www.craftattitude.com

Press  here to be redirected to Craft Attitude -  FREQUENTLY ASK QUESTIONS

Happy Creating and Happy Holidays from my home to yours.

Thursday, February 21, 2013

Finger Tip Heaven - Random Snapshots with Craft Attitude

--------------------------------------------------------------------------------


                                   Snapshots of Mixed Media Applications with Craft Attitude
   

Tuesday, January 22, 2013

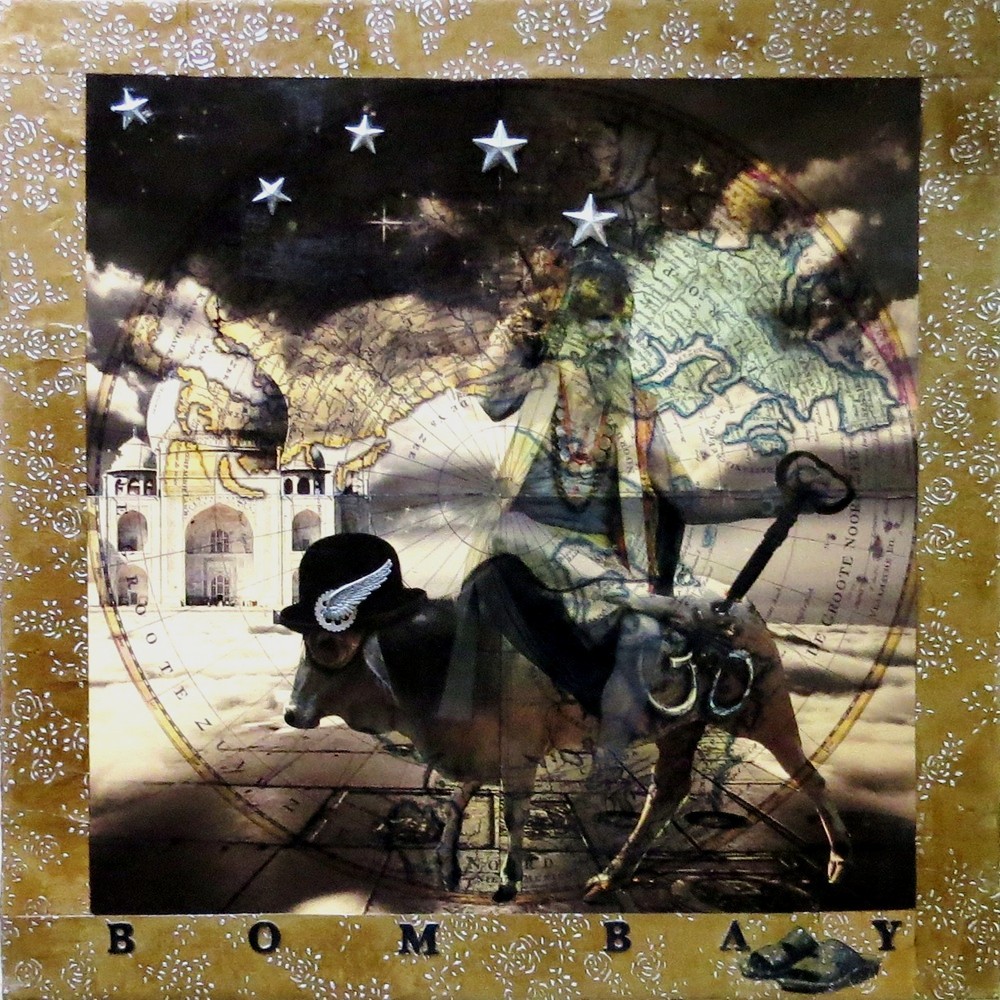
Around The World in 80 - Steampunk - Bombay - Mini Mixed Media Tutorial

--------------------------------------------------------------------------------
 As promised, I'm back to share more of the mixed media artwork I recently completed for the CHA Winter Show last week along with a few snapshots of some of the wonderful artists I met  along the way for those of you who don't follow my FB posts.


Suze Weinberg and Yours Truly

When I first began to explore the mixed media/altered art world  in 2006, one of the first artists I ran across on-line was Suze Weinberg.  Well, I'm here to tell you for a fact, she is every bit as delightful and loving and kind as you may have gathered from watching her many on-line videos.  Suze, I love ya!   What a treat it was to meet you.   Thanks for all of your encouragement and for your generous blog post review!   

 Back to the art.....

One of the unintended and  enjoyable consequences of searching for images to consider  for this project was how much I learned about the various cities.  I became an armchair traveler as I scoured the internet for copyright free images to collage. Bombay was one of my top favorite "Destinations".  I love the  rich and vibrant colors, flavors and the spirit of its people.

I'd like to quickly clarify, that while the Taj Mahal is indeed not located in  Bombay,  to me it is such an enormous architectural icon for India, I couldn't resist using it in the background.  Is this what they meant as an "Artistic License"? 

Here's where my "musings" took me.... aka  What Were You Thinking?

The sadhu is seated on the steampunk sacred cow who I equipped with a metal "OM" symbol (solar powered by the way)  in Sanskrit  and the beginning  syllable in the common mantra " Om Mani Padme Hum ."

If you look closely  (it's easier in person!) you will see the sadhu is holding a key that rotates the "OM" symbol similar to a dharma wheel.   It really works.  I swear.    While he  rotates the OM, the steampunk sacred cow moves forward and  accumulates wisdom and good karma. The Ever-Ready Steampunk Sacred Cow.  Who knew?

Around The World in 80 - Steampunk - Bombay
24x24 x 1.5 inch mixed media on gallery wrapped canvas
Image Credits:   Holliewood Studios and Eena Creations - www.deviantscrap.com
Copyright 2013 TwoDressesStudio
All Rights Reserved
-SOLD-

Mini-Tutorial

Supplies and Materials

Gallery Wrapped Canvas
Craft Attitude ( 7 8.5 x 11 inch sheets)
Handmade Textural Paper (for border)
Iron (see TIP below) or Laminator (depending on finished size)
Parchment Paper (to protect iron and Craft Attitude film)
Copyright Free Images
Acid Free Glue (for handmade cotton paper)  and E6000 glue (for metal ephemera)
Ephemera (stars, sprocket, letters)
Liquitex Satin Varnish 
Large Paint Brush 
Exacto Knife
Scissors
Computer/Inkjet Printer
 
This collage has seven individual layers to it including the handmade paper border in ochre and silver that wraps around the edges of the canvas.  Unfortunately, I do not have a series of step-by-step photographs.  Next time!

1.  Image of Western Hemisphere -  inkjet printed onto canvas and then stretched and wrapped  (24x24x1.5 inches)

2.  Print images onto Craft Attitude with any inkjet printer.  Cut out the images as desired.

3.  Place canvas on a secure surface,  and  using an iron on a cotton setting over parchment paper,  layer and adhere images one at a time sequentially.   Much like a sandwich - secure surface, canvas, image printed on to Craft Attitude, parchment paper and the iron.  Repeat with each image.

 TIP:  You may want to first test your iron on a small remnant of the Craft Attitude film.

If you are creating a smaller composition, you also have 3 other alternatives for adhering the Craft Attitude film to your substrate - with a glue stick, with a spray adhesive, or if you are working on a flat substrate, you can run the substrate and the Craft Attitude film together, sandwiched between a carrier sheet through a heat laminator.  

4.  Create border with paper of your choice.  I like the handmade cotton papers because if there is any seams created, the fibers on the edges seem to blend well.

5.  Apply a coat of varnish to seal the images (optional).


6. To finish,  I added the Sadhu's sandals, the wing and sprocket on the cow's ear,  the stars that I sprayed silver and distressed and finally the letters to spell Bombay.  As you can see below,  I had initially altered the cow digitally to add the wheels (inspired by Hollie Haradon's Steampunk Animals Kit) but reverted back to regular hoofs on the final canvas.

 Here are a few of the 'screen captures' as I mapped out the composition:


Next up this week:  Chunky TEXTURAL ATC wood blocks!  Thanks for dropping by - I hope you enjoyed the "Why and How I Created This" as much as I enjoyed creating it!

FYI - Craft Attitude is available for purchase  here